A Step-by-Step Guide to Measuring and Determining Glass Size for Your Sliding Glass Barn Door
Sliding glass barn doors have become increasingly popular in modern interior design, adding elegance and functionality to any space. One crucial aspect of installing a sliding glass barn door is accurately measuring and determining the glass size. In this blog post, we will guide you through the step-by-step process to ensure an accurate measure for glass and a seamless installation. It’s important to note that although this is a great DIY project, it’s always wise to consult a professional, such as a contractor or glass supplier, if you are uncertain about measuring, determining the glass size or installing. They have the expertise to guide you and ensure accurate measurements for a perfect fit. Same goes for installation. With good information such as what’s listed below, with good research, the right tools and a bit of skill, sliding glass barn doors CAN be installed by a layman, but it’s always a good idea to consult a pro. Particularly for installation.
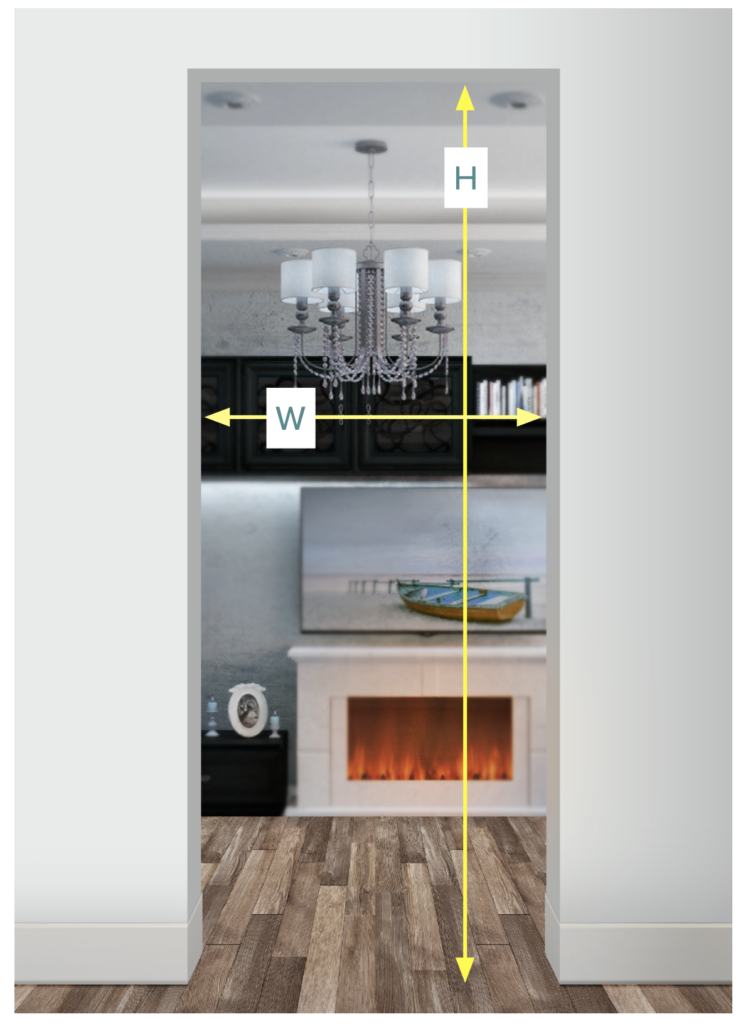
Determining the Glass Size
- Step 1: Measure the finished door opening. (Meaning, drywall, texture and painting is all finished!) To begin, grab a tape measure and measure the width and height of the door opening where the sliding glass barn door will be installed. Take accurate measurements to ensure a precise fit.
- Step 2: Calculate the Glass Size by adding 4″ to the opening width, and 1″ to the opening height.
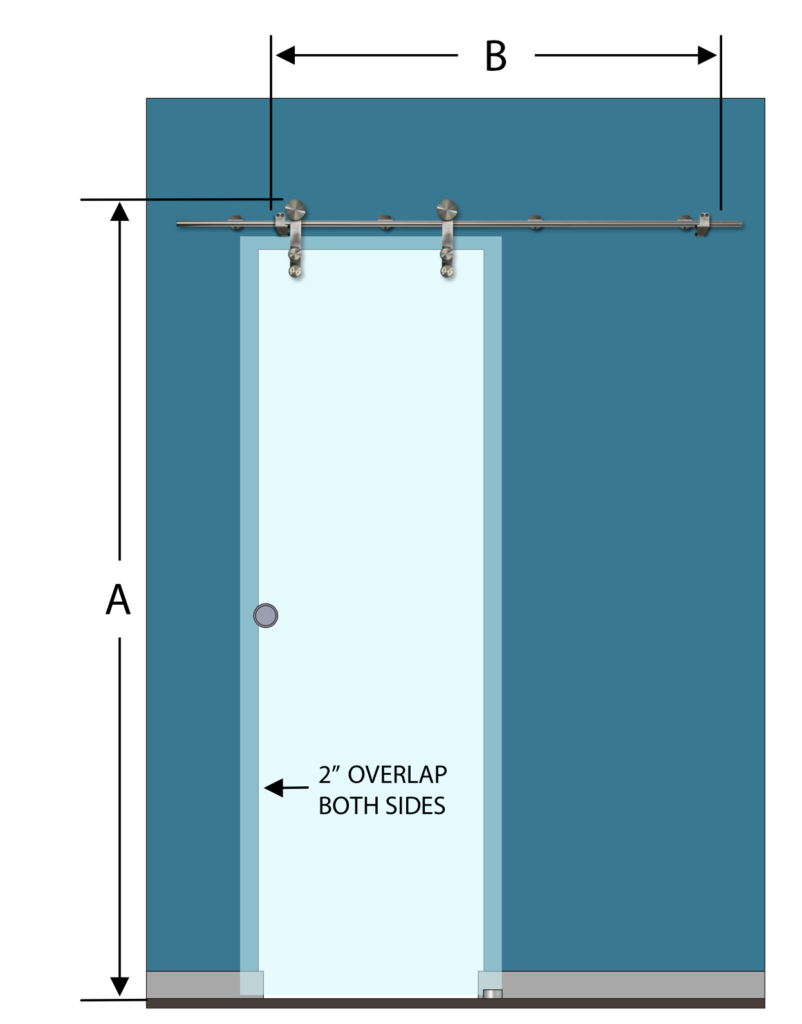
Determining the Track Size
Quick insight: The length of the track is based on the width of the glass.
The track will need to be long enough so that when the door is slid completely open, there’s enough space on the wall and enough length in the track, for the glass to hang without hanging over the opening. You want to take full advantage of the entire opening space that you have. The track length = the width of the glass x2, rounded UP to the nearest track length of your chosen or hardware comes in. For example: A common interior door size or opening is 28″ wide. To properly cover the opening, the glass width will be 32″ wide. The track will need to be a minimum of 64″ wide to accommodate the glass width of 32″. The nearest common track length sold that’s closes to 64″ will likely be 72″ or 6 feet long. Steps would be as follows:
- Step 1: Determine the glass width based on the opening.
- Step 2: Take the Glass Width and multiply it by 2.
- Step 3: Round up to the nearest available track length, and select that length.
Determining Minimum Return Wall Distance or Size
The next important step is to make sure you have enough wall space in the direction the sliding glass barn door is going to slide! To get the wall size, take the glass width and add 4-1/4″. An example would be:
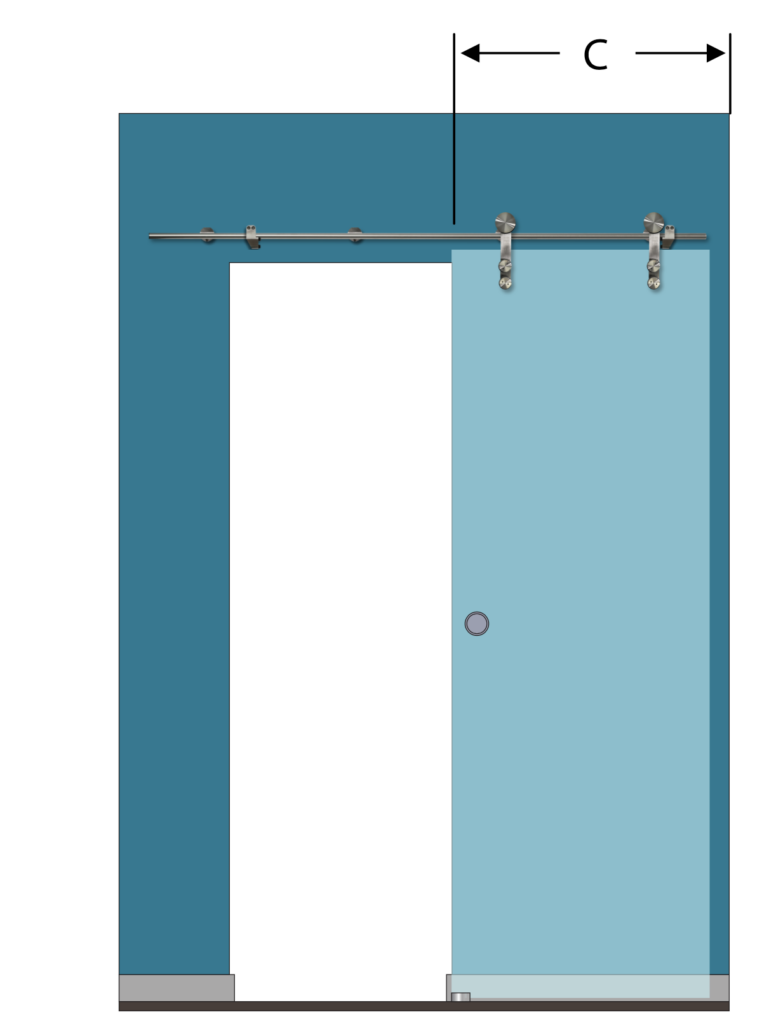
- Your finished opening width is 28″.
- Your glass width will be 32″.
- The Wall Distance or size needs to be a minimum of 32-1/4″.
Download this Helpful Guide To Determine Glass & Track Size
Installation
As we mentioned at the start, it’s always advisable to consult with a professional, such as a contractor or glass supplier for installation of your new sliding glass barn door. That said, here’s a step by step by guide on how to do it:
- Step 1: Gather the necessary tools and materials Before you begin, make sure you have all the tools and materials required for the installation. This typically includes a sliding barn door kit, which includes the track, rollers, and necessary hardware, as well as a drill, level, measuring tape, screwdriver, and any additional tools specified in the kit’s instructions.
- Step 2: Measure and mark the placement Measure the height and width of the door opening to determine the appropriate size for your sliding glass barn door. Use a pencil to mark the desired placement of the track on the wall above the opening. Ensure that the track is level by using a level tool.
- Step 3: Install the track Following the manufacturer’s instructions, install the track onto the marked area using the provided screws and anchors. Make sure the track is securely attached to the wall and level.
- Step 4: Attach the rollers to the door Attach the rollers to the top of the sliding glass barn door according to the manufacturer’s instructions. Ensure that the rollers are securely fastened and aligned properly.
- Step 5: Hang the door With the help of a friend or family member, lift the sliding glass barn door and place the rollers onto the track. Gently slide the door back and forth to ensure smooth movement along the track. Make any necessary adjustments to ensure the door is level and properly aligned.
- Step 6: Install the door stops Install the door stops at the desired positions along the track to prevent the sliding glass barn door from sliding off the track or hitting the wall. Follow the manufacturer’s instructions for proper installation.
- Step 7: Install any additional hardware If your sliding glass barn door requires additional hardware, such as handles or pulls, follow the manufacturer’s instructions to install them securely onto the door. Ensure that the hardware is properly aligned and tightened.
- Step 8: Test and adjust Once the installation is complete, test the sliding glass barn door by sliding it back and forth along the track. Ensure that it moves smoothly and without any obstructions. If necessary, make any adjustments to the track, rollers, or door stops to achieve optimal functionality.
Conclusion
Installing a sliding glass barn door can be a rewarding DIY project that adds a touch of modern elegance to your space. By following this step-by-step guide, you can confidently install your sliding glass barn door and enjoy the convenience and aesthetic appeal it offers. Remember to carefully read and follow the manufacturer’s instructions and seek professional assistance if needed. With proper installation, your sliding glass barn door will become a stunning focal point in your home or office.
Custom Art Glass Sliding Glass Barn Doors by Sans Soucie
Click here to see our vast collection of stunning art glass barn doors in every decor style, from semi-private to 100% obscure! Doors are custom made to order, available as single or pairs and come with a quality hardware kit. You’ll receive a custom scale drawing for approval to ensure the glass is fabricated to your needed slide direction, with the artwork (design) laid out with your preferred look.
Sans Soucie Art Glass: Decorative, Custom & Frosted Glass Doors, Windows, Showers & Stained Glass Since 1976
Family-owned and operated since 1976, Sans Soucie Art Glass leads the industry in decorative glass and custom glass design — from sandblast frosted glass and carved glass to hand-painted and stained glass art — transforming ordinary glass into Works of Art Captured in Glass recognized worldwide.
Innovative Frosted Glass Door Designer Tool
In 2010, we invented and launched our Frosted Glass Pantry Door Designer – a fun, easy-to-use tool that makes it simple for anyone to design and customize not only pantry doors, but a wide range of frosted glass doors for every room.
Explore our Frosted Glass Doors Collection
Our custom frosted glass doors include a beautiful variety for every style and space:
- Pantry Doors
- Frosted Glass Interior Door
- Interior Doors with Frosted Glass
- Frosted Glass French Doors
- Frosted Glass Front Door
- Front Doors with Frosted Glass
- Interior Glass Doors
- Glass Barn Doors
- Frosted Glass Barn Door
- Sliding Glass Barn Door
- All Glass Doors Interior
- All Glass Front Doors
- Bathroom Doors with Frosted Glass
- Laundry Room Doors
- Wine Room Doors
If you already have a door, and only need the glass insert, we also offer:
- Frosted Glass for Interior Doors
- Door Glass Inserts for Front Doors
- Glass Panels for Pantry Doors
- Frosted Glass Inserts for Bathroom Doors
- Laundry Room Door Glass Inserts
- Glass Panels for Interior Wine Cellar Doors
Elegant Frosted Glass Throughout Your Home
While our frosted glass doors are a top choice, we also create stunning glass products for every area of your home, including:
- Frosted Glass Shower Doors
- Glass Shower Partition
- Frosted Glass Shower Panel
- Frosted Glass Showers
- Frosted Glass Windows
- Bathroom Window Frosted Glass
- Decorative Window Glass, Window Frosting
- Custom Glass Dining Table
- Custom Glass Coffee Table
- Glass Shelves, Custom Glass Shelves
- Hand Carved & Painted Mirrors
- Frosted Glass Signs, Etched Glass Signs
- Cabinet Door Glass Inserts, Frosted Glass Inserts for Cabinet Doors
- Glass Wall Art, Wall Art on Glass
Looking for Inspiration? Explore Our Galleries
Discover visual idea boards, style concepts, décor applications, real project photos, and helpful information in our expanding gallery collection:
- Custom Glass
- Custom Glass Edges
- Custom Mirror
- Decorative Glass
- Decorative Glass Doors
- Decorative Glass Front Doors
- Decorative Glass Interior Doors
- Decorative Glass Window
- Stained Glass
- Stained Glass Doors
- Stained Glass Front Doors
- Stained Glass Windows
Free Shipping. Expert Packing, Peace of Mind
With FREE SHIPPING on most orders and worldwide delivery from our studio in Palm Desert, California, every order is packed in-house by our expert glaziers using custom materials and proven methods — ensuring safe arrival with a damage rate of less than 1%!
Explore our complete frosted glass doors collection and find the perfect frosted glass door for your space. Have questions? Contact us today!
Copyright © 2025, Sans Soucie Art Glass. All rights reserved.