How to Install an Exterior Door
Thinking about replacing an exterior door with a new one? New glass entry doors are a great investment to your home! In addition to design and saving on your energy bill, new glass entry doors can make your home more inviting and increase your overall curb appeal.
Better yet, installing a pre-hung exterior door is not as scary as it sounds. Read our step-by-step guide on how to install a pre-hung exterior door below. Hint, you can do it all in one day!
What you’ll need:
-Pre-hung exterior door
-Cement screws
-deadbolt lock
-doorknob/doorknob hardware
-wood shims
-wood trim
-fourpenny nails
-cut nails
-pressure-treated lumber
-latex caulk
-6’ level
-pry bar
-tape measure
-drill
-hammer
-utility knife
-Work gloves
-Eye protection
Before beginning your DIY project, make sure that when you remove your old door, you have the new exterior door on hand and ready to install.
- Remove old door, frame and molding
First, you need to remove the old door. The best way to do this is by having someone hold the door and another person remove the screws, hinges and hinge pins.
Next, grab the utility knife and score the caulking between the molding and exterior to break the seal. Carefully remove the molding, door jamb, framing, and threshold.
- Measure

Once your old door is gone, you’ll need to calculate the dimensions of the door opening. Measure the thickness of the wall, width between the side jambs and the head jamb to the seal under the old threshold. Measure at least three times to make sure you have the exact measurements.
After you’ve calculated your measurements and with the shipping brackets still attached, carefully center the new door in the opening. By doing this you can see where shims will need to be placed under the lower side jamb until the unit is plumb and level. Next, place the new door safely off to the side.
- Mark plumb lines
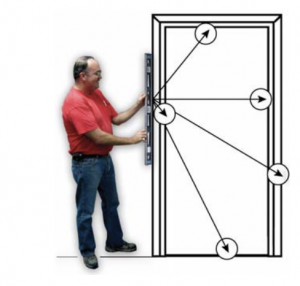
Using the level, mark plumb lines on both sides in order to help you when you put in the new molding.
- Installation
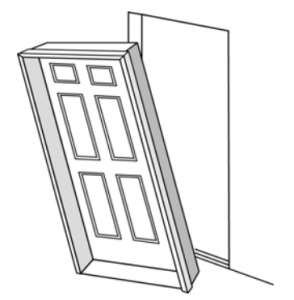
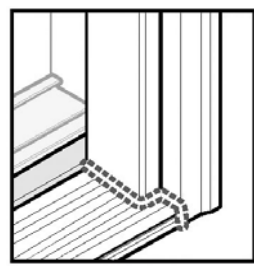
Now, you’re ready to install your new door. Start by putting in a thick bead of latex caulk at the subseal, located at the bottom of the old door opening. Place the pre-hung door over the bottom seal first, in the center of the rough opening, and then tilt it into place.
Next, secure the door at each shim location with cement screws*. If necessary, trim off excess shims using your utility knife.
Now, you’re ready to remove the shipping brace and test out your new door. If it looks good, you’ll then need to attach the long-anchor screws into the hinges and door frame.
*If you have a wood frame, be sure to use casing nails.
- Seal and insulation
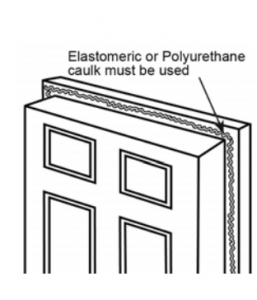
If your new door is good to go, the final step is to seal the door and add insulation. Use a caulk gun and caulk around the entire door. You’ll also need to install fiberglass insulation between the door frame and opening on the inside.
Next, install the trim to the door using fourpenny finishing nails. The last step? Install your door knob and deadbolt to your new exterior door.
If you want to add a splash of color, paint your door and frame to further increase your curb appeal. Most pre-hung doors already have a coat of primer, so they’re ready to be painted.
Looking for new and stylish entry doors? Check out our collection here.
Sans Soucie Art Glass: Decorative, Custom & Frosted Glass Doors, Windows, Showers & Stained Glass Since 1976
Family-owned and operated since 1976, Sans Soucie Art Glass leads the industry in decorative glass and custom glass design — from sandblast frosted glass and carved glass to hand-painted and stained glass art — transforming ordinary glass into Works of Art Captured in Glass recognized worldwide.
Innovative Frosted Glass Door Designer Tool
In 2010, we invented and launched our Frosted Glass Pantry Door Designer – a fun, easy-to-use tool that makes it simple for anyone to design and customize not only pantry doors, but a wide range of frosted glass doors for every room.
Explore our Frosted Glass Doors Collection
Our custom frosted glass doors include a beautiful variety for every style and space:
- Pantry Doors
- Frosted Glass Interior Door
- Interior Doors with Frosted Glass
- Frosted Glass French Doors
- Frosted Glass Front Door
- Front Doors with Frosted Glass
- Interior Glass Doors
- Glass Barn Doors
- Frosted Glass Barn Door
- Sliding Glass Barn Door
- All Glass Doors Interior
- All Glass Front Doors
- Bathroom Doors with Frosted Glass
- Laundry Room Doors
- Wine Room Doors
If you already have a door, and only need the glass insert, we also offer:
- Frosted Glass for Interior Doors
- Door Glass Inserts for Front Doors
- Glass Panels for Pantry Doors
- Frosted Glass Inserts for Bathroom Doors
- Laundry Room Door Glass Inserts
- Glass Panels for Interior Wine Cellar Doors
Elegant Frosted Glass Throughout Your Home
While our frosted glass doors are a top choice, we also create stunning glass products for every area of your home, including:
- Frosted Glass Shower Doors
- Glass Shower Partition
- Frosted Glass Shower Panel
- Frosted Glass Showers
- Frosted Glass Windows
- Bathroom Window Frosted Glass
- Decorative Window Glass, Window Frosting
- Custom Glass Dining Table
- Custom Glass Coffee Table
- Glass Shelves, Custom Glass Shelves
- Hand Carved & Painted Mirrors
- Frosted Glass Signs, Etched Glass Signs
- Cabinet Door Glass Inserts, Frosted Glass Inserts for Cabinet Doors
- Glass Wall Art, Wall Art on Glass
Looking for Inspiration? Explore Our Galleries
Discover visual idea boards, style concepts, décor applications, real project photos, and helpful information in our expanding gallery collection:
- Custom Glass
- Custom Glass Edges
- Custom Mirror
- Decorative Glass
- Decorative Glass Doors
- Decorative Glass Front Doors
- Decorative Glass Interior Doors
- Decorative Glass Window
- Stained Glass
- Stained Glass Doors
- Stained Glass Front Doors
- Stained Glass Windows
Free Shipping. Expert Packing, Peace of Mind
With FREE SHIPPING on most orders and worldwide delivery from our studio in Palm Desert, California, every order is packed in-house by our expert glaziers using custom materials and proven methods — ensuring safe arrival with a damage rate of less than 1%!
Explore our complete frosted glass doors collection and find the perfect frosted glass door for your space. Have questions? Contact us today!
Copyright © 2025, Sans Soucie Art Glass. All rights reserved.